
Instructions
First Time Use
Please examine your shipping box for damage. You should have a package that looks like this one:

Cut the shipping label off, then cut the tape to open the top of the package:

Pull the invoice and the corners of the bubble wrap to pull out the kit.

Unwrap the bubble wrap and stand the jar up.

First, unscrew the mason jar ring, then remove the contents of the jar.

Remove the glass items from the bubble wrap and make sure that they are intact. Contact us immediately if your items broke during shipping.

We strongly recommend that you wash your JarHeadz before you use it for the first time. We have not done any cleaning steps on the glassware!
We really do recommend cleaning JarHeadz in your dishwasher! You can also use hot water and dish soap with a sponge. Load the JarHeadz in the top rack of your dishwasher like this:

You don’t need to use any special settings like heavy wash, high-heat, power dry, or sanitize mode on your dishwasher. A regular wash cycle is enough to get even the dirtiest JarHeadz clean. Please do not high-heat modes in your dishwasher, because your JarHeadz kit may warp if it gets too hot.
Please do not use solvents (besidess alcohol), especially acetone, on the 3D printed parts. It may dissolve away some of the pigment and/or weaken the plastic.
General Usage
If you're going to add ice or anything into the jar, add it before starting these instructions.
Start by placing the lid on top of the jar.

Next clamp it in place with the ring.

Now line up the arrows on the lid and neck.

The threads should engage. Turn the neck one whole rotation clockwise.

Add water through the neck or downstem to your taste.

Finally add the bowl, and you're ready to rock!

Start by removing the bowl.
Empty out the water by pouring it out of the neck.
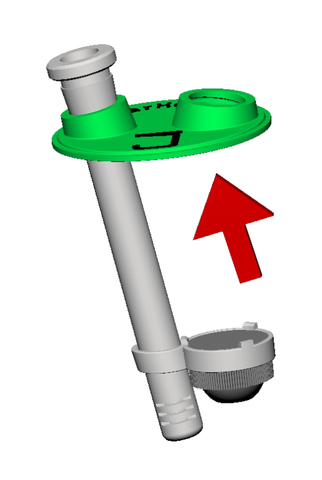
Now twist the neck counterclockwise one full rotation. It should come free from the lid.
Remove the downstem. Always pull on the ground glass joint, never push on the flutes to release the downstem. Rock the ground glass joint side to side if it is stuck.
Unclamp the ring.
Everything should be disassembled now!
Start with a disassembled JarHeadz kit.
Add the neck to the jar as shown.
Place the lid upside down on the jar.
Insert the downstem into the downstem hole.
Add the clamp ring to secure the lid.
Insert the bowl into the bowl storage slot.

And you've stowed your kit!
Spill resistant features apply to the JarHeadz Ergo Neck when used with an 8oz mason jar.
When the water level is 2oz / 60ml or lower, a JarHeadz will not spill when knocked on its side onto a level surface, even when it rolls.
When the water level is below 2.5oz / 75ml, a JarHeadz will not spill when knocked on its side, if it does not roll.
When the water level is above 2oz / 60ml, a JarHeadz that has been knocked over and begins to spill will stop spilling at the 2oz / 60ml level, preventing the spill from getting worse.
Using ice will greatly enhance the cooling power of JarHeadz over just using water. While the cooling effect of ice is very nice when smoking through JarHeadz, it is necessary for dabbing and heavy oil pen use, due to the higher temperature of the vapor. It hurts to take a scalding hot dab!
Crushed ice and shaved ice work perfectly in JarHeadz. The large surface area of crushed and shaved ice means that it cools the smoke amazingly well. If you have an ice crusher or shaver built into your refrigerator, we highly recommend trying it. On the other hand, the finer the size of ice used, the faster it will melt.
Sometimes you just want to relax and take it slow. In testing, we determined that ice with a 1/2" cross section had the slowest melting time while still packing neatly into the available space.
Please note that there must be room for the downstem to fit in the jar, so it is necessary to use ice cubes no bigger than 1″ in profile. Don't try to force the downstem into place if it doesn't fit with the ice.
We are currently testing a percolator insert that will allow for even more cooling by mixing the smoke/vapor and water even more thoroughly!
Never leave your JarHeadz kit in a freezer.
Accessories
Take a fully-assembled JarHeadz Kit.
Now unscrew your JarHeadz neck to remove it.
Screw the extender into the JarHeadz Lid by lining up the arrows on the lid receiver and the threaded side of the extender,

then turning the extender one full turn into the lid.
Next, line up the extender receiver and neck arrows in the same way,

then turning the neck one full turn into the extender.
You will need a banger with carb cap, a torch, and concentrates of your choice. It is highly recommended to use the neck extender due to the high heat that is applied to the banger, and ice for the same reason. We recommend our dabber for people who are already familiar with how to use concentrates.
To use the oil pen adapter, first make sure that the oil pen draws easily. Next, plug your oil pen into the larger opening of the oil pen adapter. The adapter is designed to rest on the seam of the CCell cartridge tip, where the glass meets the mouthpiece. If you over-insert the oil pen, it may not seal as well, or look as cool.

Once the oil pen is properly seated, insert the other end of the adapter into the downstem. There is a carb hole on the flat surface of the oil adapter. When assembled with the oil pen adapter your JarHeadz kit should look like the picture below.

Once the adapter is assembled, cover the carb hole with your finger and draw on the JarHeadz. If the oil pen doesn't light up when you draw, make sure that everything is sealed correctly and not leaking.
To use the light kit, start by inserting the LED into the mounting bracket, if necessary.

Stop when the base of the LED is flush with the bracket. This is important to maintain airflow.

Next, twist the LED clockwise to turn it on. Note: before first use, you may need to twist the LED apart and remove the battery protector.

Carefully insert the downstem (with lid attached) into the mounting bracket with the LED facing down. Use a twisting motion and dish soap if necessary. The LED is waterproof, so you can rinse the soap off when you're done.
Enjoy your remote-controlled light kit!
Note: If you use the remote to turn off the LED, it isn't actually off, and the batteries will drain quickly. It is recommended to turn the LED completely off when not in use by twisting the housing counter-clockwise.
